2. Payables Setup Options
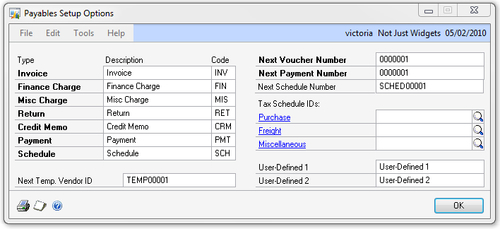
The Payables Setup Options window (Microsoft Dynamics GP | Tools | Setup | Purchasing | Payables | Options) allows you to set:
Codes used for each payables transaction type
The numbering scheme and next number for each transaction type
Tax schedules for payables transactions
Labels for the user-defined vendor fields
It is not recommended to change the Descriptions and Codes
for transaction types, as that will make support and training more
difficult. The default numbers for vouchers and payments are quite long
and most companies will never need so many digits in them, so consider
shortening these to make them more user-friendly. The following
screenshot is an example of the Payables Setup Options window:
3. Vendor classes
Vendor classes in Dynamics GP are optional but recommended, as they allow for the following three benefits:
Time saved when creating vendors:
Classes serve as a template for most of the vendor settings, so they can
offer significant time savings when creating vendors in Dynamics GP.
Time saved during vendor updates: Changes to the vendor class can be rolled down to all vendors in that class, making changes to multiple vendors quick and easy.
Reporting, filtering, and searching:
Most reports and searches in Dynamics GP offer an option to filter by
vendor class. For example, when creating a payables check batch, one of
the options is to select vendors for payment by vendor class.
To set up vendor classes, click the Classes button on the Payables Management Setup window or navigate to Microsoft Dynamics GP | Tools | Setup | Purchasing | Vendor Class.
All the settings for a vendor class will be defaulted for a new vendor
created in that vendor class. Any individual vendor setting can be
changed at any time. The following list explains the fields on the Vendor Class Setup window:
Class ID: A 10-character ID that
cannot be changed once saved. When filtering by vendor class on most
reports, there will be one to/from range available. If there are certain
vendor classes that will typically be reported on together, consider
making their Class IDs start with the same character(s) so they are
sorted together in a list. For example, if you have five US and two
Canadian vendor classes, and you will typically want to report on all US
vendors separately from all Canadian vendors, you could add the
prefixes US and CAD (or U and C) to all the Class IDs.
Default checkbox: One vendor class
can be set as the default class. Once set, newly created classes will
copy all the settings from the default class. This can help save time
when setting up multiple vendor classes that are similar. The default
vendor class can be changed at any time by selecting the Default checkbox on a different class. This will automatically uncheck the Default checkbox on the class that was previously the default.
Description: A description of what
vendors are in this class. This is used to help users identify the
proper vendor class during vendor creation.
Currency ID and Rate Type ID: Select the default currency and rate type for the vendors in this class.
Payment Terms: Select the default Payment Terms ID for vendors in this class.
Discount Grace Period and Due Date Grace Period: These work together with the Use Customer/Vendor Grace Periods for Date/EOM Payment Terms option on the Payment Terms Setup window. You can enter up to 99 days for each of these settings.
Payment Priority: This is an
additional grouping available for vendors and can be used when selecting
payables checks and filtering on some of the Dynamics GP reports.
Payment priority can be a three-character alphanumeric value and it is
recommended to always use the same number of characters so that you can
use ranges of payment priorities for filtering. When sorting reports and
lookups, numbers will appear before letters.
Minimum Order: If you have a minimum order amount with vendors, you can enter it here.
Trade Discount: A trade discount
is an across-the-board discount on purchases, so that if a vendor has a
10% trade discount and you enter an invoice or purchase order for
$1,000, a $100 discount will automatically be calculated. Trade
discounts are useful in situations where you want to track the discount
in a separate General Ledger account.
Tax Schedule: If you are using purchasing taxes, enter the default Tax Schedule ID for this vendor class.
Shipping Method: Enter a default Shipping Method ID for this class.
Checkbook ID: It is recommended to
set up Checkbook IDs for vendors or vendor classes only when different
checkbooks are used for payments to different vendors (for example, if
you are using Multicurrency and have a separate bank account for each
currency). Otherwise, if the same checkbook is typically used for all
payments in a company, leave this blank and transactions will use the
default Checkbook ID from the Payables Management Setup window.
User-Defined 1 and 2:
If you would like to store generic values for the vendor user-defined
fields, you can enter them here. If you have changed the user-defined
labels on the Payables Setup Options window, you will see those labels here, instead of User-Defined 1 and User-Defined 2.
|
It may be useful to know that the User-Defined 1
field is available as a filter on the Payables Trial Balance reports.
So if you need another filter for reports consider using this. User-Defined 2 is not available as a report filter.
|
|
Tax Type: Choose whether this vendor
class is for 1099 vendors and, if so, what type of 1099 vendor. If some
of the vendors in the class have a different tax type, you will be able
to change this during individual vendor setup.
FOB: If desired, select the default FOB type.
Minimum Payment: This setting can be used with an option to Pay Only Minimum when automatically selecting payables checks. Most of the time No Minimum is selected here.
Maximum Invoice Amount: This setting can prevent users from entering invoices above a certain amount. If an Exceed Maximum Writeoff Amount Password was entered on the Payables Management Setup window, that password can be used to override this maximum.
Credit Limit: In the Payables module,
credits limits are informational only and will not prevent users from
entering transactions that would go over the vendor's credit limit. It
is assumed that the vendor would be enforcing their limit.
Writeoff: If desired, enter a limit for writeoffs. Note that the default writeoff setting is Not Allowed. Typically in Payables, the Unlimited option is chosen for writeoffs.
Revalue Vendor: Select whether you will be revaluing transactions for vendors in this class and, if so, whether the gain/loss should go to the Payables/Discount Account or the Purchasing Offset Account. Revalue Vendor
is checked by default, whether or not you are using Multicurrency.
Leaving it checked when not using the Multicurrency module will not
cause any harm.
Maintain History: It is recommended to keep all history and select all the boxes. If anything other than Not a 1099 Vendor was chosen for Tax Type, the Calendar Year checkbox will be selected and will be non-editable as calendar year history is required to print 1099s.
The following is an illustration of a typical Vendor Class Setup window:
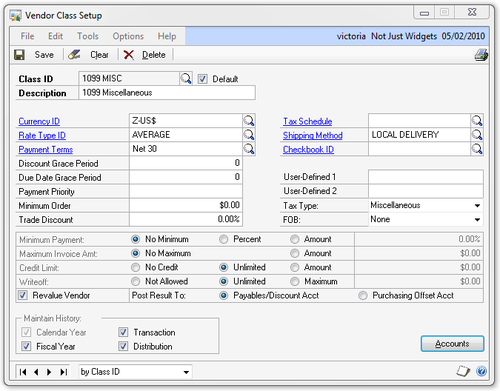
The only required fields for a vendor class are Class ID and Description, so you can fill in as much or as little detail as you need when setting up a class.
You can create an unlimited number of vendor classes,
but keep in mind that the main goal of classes is to save you time.
Creating 100 classes for 350 vendors may not be much of a time saver.
Accounts for vendor classes
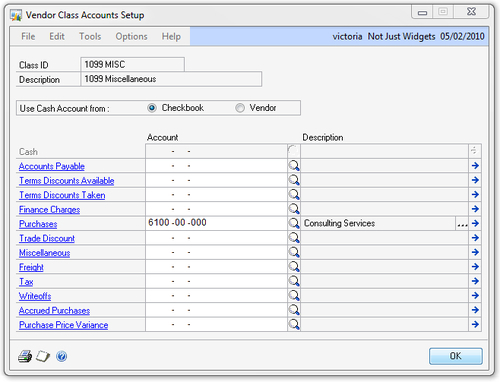
Clicking the Accounts button on the Vendor Class Setup window will open the Vendor Class Accounts Setup
window. These are the default GL accounts that will be used for all
transactions for vendors in this class. It is recommended to set up
accounts at the vendor class level to save time during vendor setup.
Dynamics GP determines GL accounts to be used for payables transactions using the following logic:
Use accounts set up for the vendor. These
accounts will default in from the vendor class when a vendor is being
created, but can be changed for each individual vendor as needed.
If any accounts are missing from the vendor setup, use posting accounts for the company (Microsoft Dynamics GP | Tools | Setup | Posting | Posting Accounts).
If
any accounts are still missing, leave the accounts blank. Transactions
will give a warning and fail to post if any required GL accounts are
missing.
You do not have to set up every account possible, as
many may never be used in your Dynamics GP environment. The most
important accounts to default for payables transactions are Cash, Accounts Payable, and Purchases. For the Cash account, it is recommended to select Use Cash Account from Checkbook
to avoid bank reconciliation issues. You can also save considerable
time when selecting default accounts by setting up the company posting
accounts for any accounts that are always the same for all vendors.
The following is an example of the company Posting Accounts Setup window for the Purchasing series:
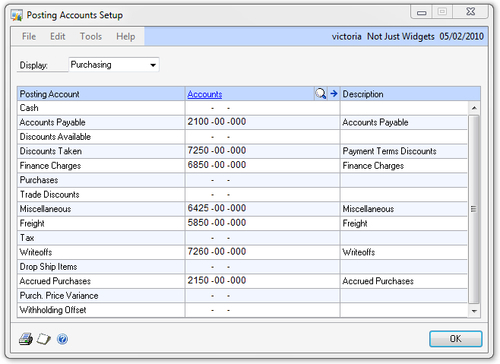
With the posting accounts shown in the previous example, the Vendor Class Accounts Setup window might look like the following, with only the Purchases account specified:
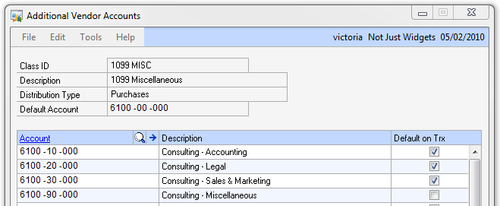
Dynamics GP also offers the ability to set up
multiple Purchases accounts for vendors. This is a very useful feature
for vendors who typically have their invoices split between multiple GL
accounts. To use this feature, perform the following steps:
Click on the ellipsis (…) at the end of the Purchases account line on the Vendor Class Accounts Setup window.
Add as many accounts as desired in the scrolling list.
Check the Default on Trx option for any account that you would like to automatically show on transactions (this is in addition to the Default Account, which will always show on transactions). Accounts without Default on Trx checked will not show on transactions automatically, but will be available from a lookup during transaction entry.
Typically, during transaction entry, rather than
having to search for and manually add all the needed GL accounts, it is
easier to have a number of accounts defaulted and simply put amounts in
for the accounts needed. Any accounts with no amount entered will be
ignored by the system.
The following screenshot illustrates a sample Additional Vendor Accounts window:
To remove lines that are not needed from the Additional Vendor Accounts list, click on the line with the account you want to remove and select Edit | Delete Row.